728x90
반응형
그림판 어플을 만들어보자
1. Adding Behaviour (touch -> new color)
from random import random
from kivy.app import App
from kivy.uix.widget import Widget
from kivy.graphics import Color, Ellipse, Line


class MyPaintWidget(Widget):

    def on_touch_down(self, touch):
        color = (random(), random(), random())  #1
        with self.canvas:
            Color(*color)  #2
            d = 30.
            Ellipse(pos=(touch.x - d / 2, touch.y - d / 2), size=(d, d))
            touch.ud['line'] = Line(points=(touch.x, touch.y))

    def on_touch_move(self, touch):
        touch.ud['line'].points += [touch.x, touch.y]


class MyPaintApp(App):

    def build(self):
        return MyPaintWidget()


if __name__ == '__main__':
    MyPaintApp().run()
이번에는 더욱 간단합니다.
color를 random()을 통해 정의해주고, Color(1,1,0)이 Color(*color)가 되었을 뿐입니다!
- 원래 Color(1,1,0)이였는데, random()을 이용해서 무작위 RGB가 되도록 color를 정의해 주었습니다.
color = (random(), random(), random()) #1- 그리고 위에서 정의한 color를 Color()에 넣어줍니다.
Color(*color) #2- color가 아닌, *color인 이유는 color는 개별 값 n1,n2,n3 가 아니라, 하나의 객체 (n1,n2,n3) 이기 때문입니다.
그리고 실행해보면
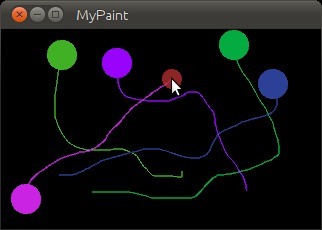
위의 사진과 같이 클릭할 때마다 랜덤한 색깔이 지정되는 조금 더 예쁜 그림판이 되었습니다!
2. Bonus Points (new widget: clear button)
아직 아쉬운 점은 많지만, 그 중 가장 아쉬운 점이라면 새로 그림을 그리고 싶을 땐 아예 어플을 나가야한다는 점이죠!
그래서 간단하게 버튼한번 누르면 기존의 그림을 지우고 새로 그림을 그릴 수 있게 해보겠습니다.
from random import random
from kivy.app import App
from kivy.uix.widget import Widget
from kivy.uix.button import Button
from kivy.graphics import Color, Ellipse, Line


class MyPaintWidget(Widget):

    def on_touch_down(self, touch):
        color = (random(), 1, 1)
        with self.canvas:
            Color(*color, mode='hsv')
            d = 30.
            Ellipse(pos=(touch.x - d / 2, touch.y - d / 2), size=(d, d))
            touch.ud['line'] = Line(points=(touch.x, touch.y))

    def on_touch_move(self, touch):
        touch.ud['line'].points += [touch.x, touch.y]


class MyPaintApp(App):

    def build(self):
        parent = Widget()
        self.painter = MyPaintWidget()
        clearbtn = Button(text='Clear')
        clearbtn.bind(on_release=self.clear_canvas)
        parent.add_widget(self.painter)
        parent.add_widget(clearbtn)
        return parent

    def clear_canvas(self, obj):
        self.painter.canvas.clear()


if __name__ == '__main__':
    MyPaintApp().run()
이번엔 MyPaintApp 클래스에 많은 코드가 추가되었습니다. 하지만 한줄한줄 읽어보면 그렇게 어려운 내용은 아닙니다.
핵심은 여기입니다.
parent = Widget()
비록 저 코드 한줄로는 parant라는 더미 객체를 만들었을 뿐이지만,
위에서 만들었던 MyPaintWidget과, 새로 만들어준 clearbtn위젯을 한데 묶어주는 역할을 할 것이기 때문이죠.
clearbtn = Button(text='Clear')  # 버튼위젯을 생성해줍니다. 버튼 안에 'clear'라고 적어줍니다.
clearbtn.bind(on_release=self.clear_canvas)  # 버튼을 눌렀다 뗄 때 self.clear_canvas 함수를 실행합니다.
parent.add_widget(self.painter)
parent.add_widget(clearbtn)
그리고 실행시켜 보겠습니다.
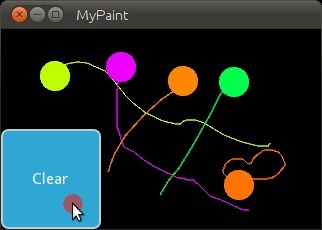
완성!!!
728x90
반응형
'파이썬 > Kivy_파이썬으로 앱만들기' 카테고리의 다른 글
| Python만으로 어플을 만들어보자 Kivy 빌드 with 구름 IDE, goorm IDE (0) | 2023.02.08 |
|---|---|
| Python만으로 어플을 만들어보자 (create an application) (0) | 2023.01.20 |


댓글